
Prep Time: 10–15 minutes
Skill Level: Beginner-Friendly
Best For: Sourdough country loaves, artisan bread, rustic boules
What You Need
- Fully fermented sourdough dough
- Lightly floured work surface
- Bench scraper
- Rice flour or bread flour (for dusting)
- Banneton basket or bowl lined with a floured towel
- Clean kitchen towel
Before Shaping Your Boule
Make sure your dough has completed bulk fermentation.
Your dough should:
✓ Look smoother and puffier
✓ Have visible bubbles around the edges
✓ Increase in volume by about 50%
✓ Jiggle slightly when the bowl is moved
✓ Hold some structure instead of spreading immediately
Avoid shaping dough that is under-fermented because it may create a dense loaf. Over-fermented dough can become difficult to shape and may lose strength.
Step 1: Prepare Your Work Surface
Lightly dust your counter with flour.
Do not add too much flour—excess flour can prevent the dough from gripping the surface and developing tension.
Turn the dough out gently from the bowl.
Try not to press out all the air bubbles you worked hard to create during fermentation.
Step 2: Pre-Shape the Dough
Using a bench scraper, gently gather the dough into a loose round.
Pull the edges of the dough toward the center:
- Fold the top edge down.
- Fold the bottom edge up.
- Fold the sides inward.
- Flip the dough seam-side down.
Use your hands or scraper to gently drag the dough toward you.
This creates a smooth surface and begins building strength.
Step 3: Rest the Dough
Cover the pre-shaped dough with a clean towel.
Allow it to rest:
15–30 minutes
This resting period allows the gluten to relax, making the final shaping easier.
The dough should spread slightly but still maintain a rounded shape.
Step 4: Final Boule Shaping
Lightly flour the top of the dough.
Flip it over so the floured side is underneath and the sticky side is facing up.
Now create tension:
Fold the Dough
- Pull the top section of dough toward the center.
- Fold the bottom section upward.
- Fold the left side toward the middle.
- Fold the right side toward the middle.
You should now have a compact package of dough.
Step 5: Create Surface Tension
Flip the dough so the seam side is underneath.
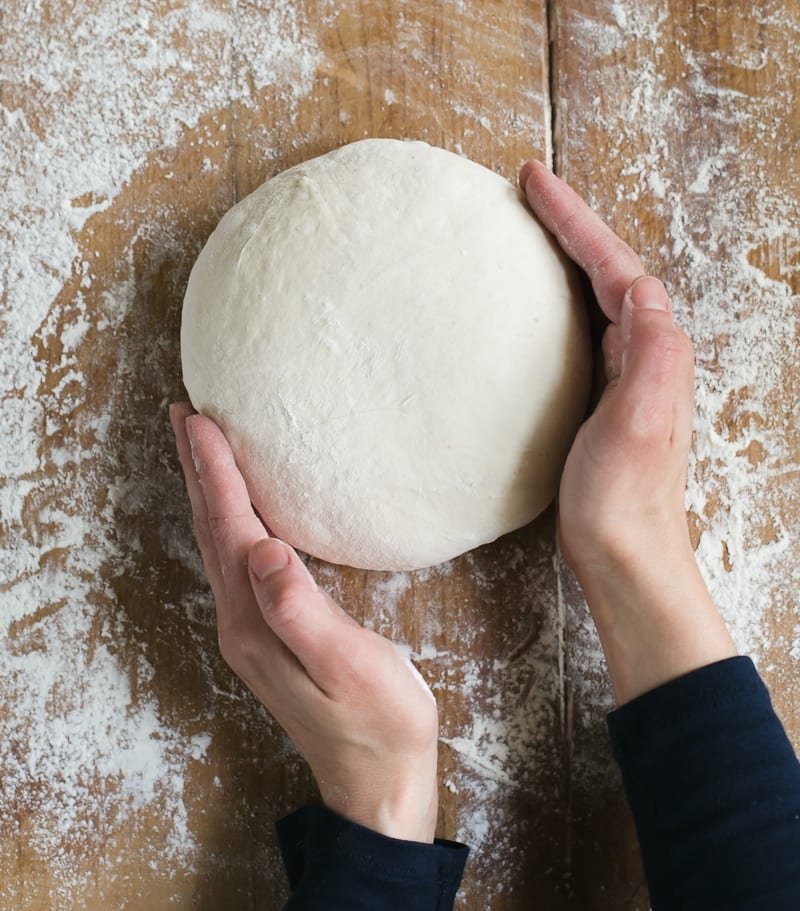
Cup your hands around the dough.
Gently pull the dough toward yourself across the counter.
Rotate slightly and repeat.
Continue until the dough forms a smooth, tight round shape.
The surface should feel stretched and slightly firm.
Step 6: Place Into the Banneton
Dust a banneton basket generously with rice flour or bread flour.
Using a bench scraper, lift the dough carefully.
Place it into the basket:
Seam-side up
Cover with a towel or plastic wrap.
Step 7: Final Proof
Allow the shaped boule to proof.
You can choose:
Room Temperature Proof
- 1–3 hours
or
Cold Proof
- 8–16 hours in the refrigerator
Cold proofing helps develop deeper flavor and makes scoring easier.
Step 8: Bake Your Boule
When ready to bake:
- Preheat a Dutch oven to 450–500°F (230–260°C).
- Turn the dough onto parchment paper.
- Score the top with a sharp blade.
- Transfer into the hot Dutch oven.
- Bake until golden brown and crisp.
A properly shaped boule should rise upward instead of spreading outward.
Tips for the Perfect Sourdough Boule Shape
- Use minimal flour while shaping so the dough can grip the counter.
- Build enough surface tension without tearing the dough.
- Handle the dough gently to preserve air bubbles.
- Use a bench scraper to move sticky dough easily.
- Rice flour prevents sticking better than regular flour in bannetons.
- Do not rush the resting period between pre-shaping and final shaping.
- A smooth, tight dough surface creates a beautiful bakery-style crust.
Common Boule Shaping Mistakes
Dough Spreads Flat
Possible causes:
- Weak gluten development
- Over-proofing
- Not enough surface tension
Solution:
Practice tighter shaping and adjust fermentation time.
Dough Tears During Shaping
Possible causes:
- Too much tension
- Dough is too dry
- Gluten is not developed enough
Solution:
Handle gently and allow the dough to rest longer.
Dough Sticks Everywhere
Possible causes:
- Too much moisture
- Not enough flour on hands or tools
Solution:
Use slightly damp hands or dust lightly with flour.
Final Notes
A beautifully shaped sourdough boule comes from creating strength, not forcing the dough. Gentle folds, proper fermentation, and careful tension-building are what create that classic round artisan loaf with a crisp crust and soft, airy center. With practice, shaping becomes one of the most satisfying steps in the sourdough process.
