Ingredients
- 500g unbleached bread flour or all-purpose flour (used over several days)
- 500g filtered, chlorine-free water, room temperature (70–75°F / 21–24°C)
Optional (Recommended for Faster Fermentation)
- 100g whole wheat flour or rye flour (replace part of the white flour during the first few feedings)
Equipment
- 1 large glass jar (1-quart or larger)
- Digital kitchen scale
- Silicone spatula or wooden spoon
- Rubber band or marker
- Loose-fitting lid or clean kitchen towel
- Thermometer (optional)
Instructions
Day 1 – Create the Starter
- In a clean glass jar, combine:
- 100g flour
- 100g room-temperature filtered water
- Stir until a thick, smooth batter forms with no dry flour remaining.
- Scrape down the sides of the jar.
- Mark the level with a rubber band.
- Cover loosely and leave at room temperature (70–78°F / 21–26°C) for 24 hours.
What to Expect:
The mixture may look unchanged today. This is completely normal as the natural fermentation process begins.
Day 2 – First Feeding
- You may notice a few bubbles or a mild floury aroma.
- Discard all but 100g of the starter.
- Feed with:
- 100g flour
- 100g water
- Mix thoroughly until smooth.
- Cover loosely and let ferment for another 24 hours.
Day 3 – Fermentation Increases
By now, the starter should begin producing more bubbles and may have a slightly fruity or tangy aroma.
- Discard all but 100g starter.
- Add:
- 100g flour
- 100g water
- Stir well.
- Cover and let rest for another day.
Don’t worry if the starter rises and falls quickly—it is still developing.
Day 4 – Strengthening the Culture
The starter should now become noticeably more active.
Repeat the feeding:
- Keep 100g starter.
- Add 100g flour.
- Add 100g water.
- Mix until smooth.
The starter may double in size after feeding.
Day 5 – Check for Readiness
Your starter should now:
- Double in volume within 4–8 hours
- Be filled with bubbles
- Smell pleasantly tangy, fruity, or slightly yogurt-like
- Have a light and airy texture
Feed again:
- 100g starter
- 100g flour
- 100g water
If it isn’t consistently doubling, continue daily feedings.
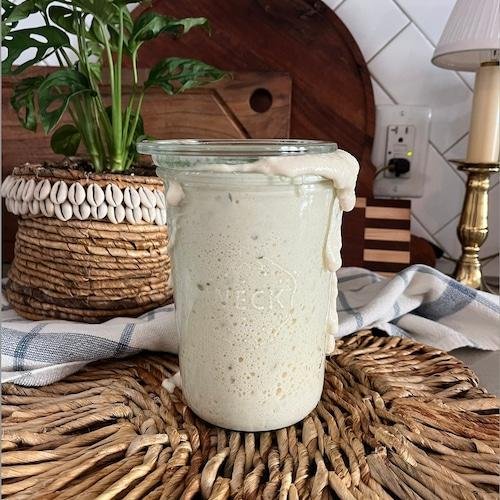
Days 6–7 – Mature Starter
Continue feeding every 24 hours until your starter reliably doubles or triples after each feeding.
A mature starter should:
- Rise consistently after feeding
- Hold plenty of bubbles throughout
- Have a pleasant sour aroma
- Feel light and elastic when stirred
- Peak within 4–8 hours
Once it reaches this stage, it is ready for baking.
Daily Feeding Schedule
For frequent bakers:
- 50g mature starter
- 50g filtered water
- 50g bread flour
Mix well and allow it to rise until doubled before using.
Refrigerator Storage
If you bake once a week or less:
- Feed the starter.
- Leave it at room temperature for 1–2 hours.
- Refrigerate in a loosely covered jar.
Feed it every 7 days.
Before baking:
- Remove from the refrigerator.
- Feed once or twice.
- Wait until it doubles before mixing your dough.
How to Know Your Starter Is Active
A healthy starter should:
- Double or triple in size
- Have many visible bubbles
- Smell pleasantly sour with fruity or yeasty notes
- Form a domed top before slowly falling
- Return to this pattern consistently after each feeding
Troubleshooting
Starter Isn’t Rising
- Move it to a warmer location (75–78°F / 24–26°C).
- Use filtered water if your tap water contains chlorine.
- Feed with some whole wheat or rye flour to encourage activity.
- Be patient—some starters take 7–10 days to mature.
Gray Liquid (Hooch)
A layer of liquid means the starter is hungry.
Pour it off or stir it back in if you prefer a more sour flavor, then feed the starter.
Unpleasant Smell
During the first few days, the starter may smell cheesy or slightly unpleasant as different microorganisms compete. This is a normal part of the process.
If you see pink, orange, green, or black mold, or fuzzy growth, discard the starter and start again with a clean jar.
Pro Tips
- Always weigh ingredients for accuracy.
- Use room-temperature filtered water.
- Keep the jar loosely covered to allow gases to escape.
- Clean the sides of the jar after each feeding.
- Feed at roughly the same time every day.
- A warm, draft-free environment encourages healthy fermentation.
Ways to Use Your Active Starter
Once mature, your starter can be used to make:
- Artisan sourdough bread
- Sandwich bread
- Focaccia
- Pizza dough
- Bagels
- English muffins
- Cinnamon rolls
- Soft pretzels
- Pancakes
- Waffles
- Crackers
- Brioche
- Dinner rolls
- Donuts
- Biscuits
Nutrition (Approximate per 50g active starter)
- Calories: 55
- Carbohydrates: 11g
- Protein: 2g
- Fat: 0.2g
- Fiber: 0.5g
- Sugar: 0g
- Sodium: 1mg
A Classic Active Sourdough Starter is the essential first step to exceptional homemade sourdough baking. With only flour, water, and a little patience, you’ll cultivate a thriving natural leaven that can be maintained indefinitely, providing incredible flavor, texture, and versatility for countless bread and baked goods recipes.
