What You’ll Need
Ingredients
Day 1
- 60g whole wheat flour
- 60g filtered water (room temperature)
Days 2–14
- 60g bread flour or all-purpose flour
- 60g filtered water
Equipment
- Large glass jar (1-liter capacity recommended)
- Digital kitchen scale
- Spoon or spatula
- Rubber band or marker
- Loose-fitting lid
Understanding Sourdough Starter
A sourdough starter develops through natural fermentation. Wild yeast from the flour and environment colonize the mixture and work alongside beneficial bacteria.
Over time these microorganisms:
- Produce carbon dioxide for rising bread
- Create organic acids for flavor
- Strengthen dough structure
- Improve shelf life of baked goods
The process takes time because you’re building a stable microbial culture from scratch.
Day-by-Day Instructions
Day 1: Create the Starter
In a clean glass jar combine:
- 60g whole wheat flour
- 60g room-temperature filtered water
Mix thoroughly until no dry flour remains.
The mixture should resemble a thick pancake batter.
Scrape down the sides of the jar.
Cover loosely with a lid and place in a warm area between 75°F and 80°F (24°C–27°C).
Let sit undisturbed for 24 hours.
What Happens Today?
Very little may appear to happen.
Wild microorganisms are beginning to colonize the mixture even though visible activity may be minimal.
Day 2: First Feeding
After 24 hours:
- Check for bubbles.
- Discard about half of the mixture.
- Add:
- 60g flour
- 60g water
- Stir thoroughly.
Cover loosely and leave for another 24 hours.
What to Expect
You may notice:
- Small bubbles
- Slightly sweet smell
- Mild fermentation activity
Some starters remain quiet during this stage.
Day 3: Building Activity
Discard half again.
Feed with:
- 60g flour
- 60g water
Mix thoroughly.
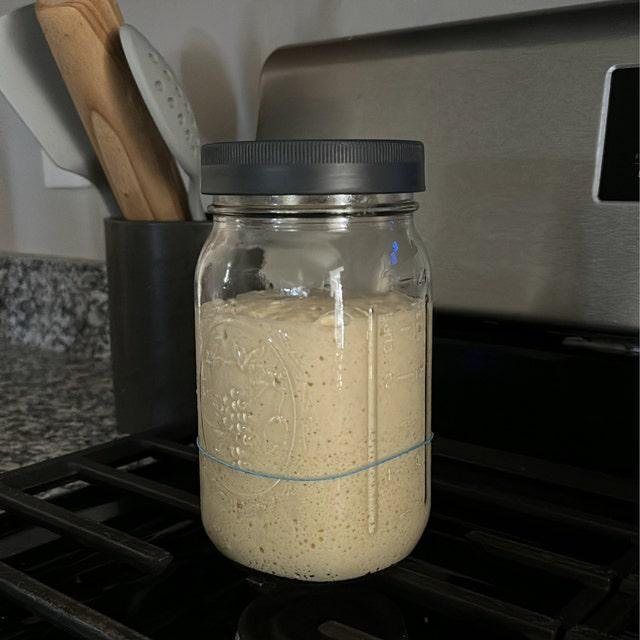
Mark the level with a rubber band.
Cover loosely.
What to Expect
Many starters become very active today.
You may see:
- Numerous bubbles
- Noticeable rise
- Slightly sour aroma
Do not assume the starter is ready yet.
This early burst is often caused by temporary bacterial activity.
Day 4: The Slowdown
Repeat feeding:
- Discard half
- Add 60g flour
- Add 60g water
Mix well.
What to Expect
Many beginners worry at this stage because activity often decreases dramatically.
You may see:
- Fewer bubbles
- Little or no rise
- Less visible activity
This is normal.
The microbial population is rebalancing.
Continue feeding consistently.
Day 5: Strengthening the Culture
Continue the feeding schedule.
If your kitchen is warm and the starter is active, you may begin feeding every 12 hours.
Signs of Improvement
- More consistent bubbling
- Better aroma
- Slight growth after feeding
The starter should smell pleasantly tangy.
Day 6: Developing Strength
Feed as usual.
Observe:
- Rise after feeding
- Bubble formation
- Texture changes
The starter should begin feeling lighter and more airy.
Large and small bubbles should appear throughout.
Day 7: Testing Readiness
Feed the starter and monitor it carefully.
A mature starter should:
- Double in size within 4–8 hours
- Contain abundant bubbles
- Have a pleasant sour aroma
- Rise and fall predictably
If these signs are present, the starter may be ready.
If not, continue feeding daily.
Many starters require 10–14 days to reach full strength.
Days 8–14: Maturing the Starter
Continue feeding every 24 hours.
The starter will become:
- More predictable
- More flavorful
- Better at rising dough
A mature starter typically doubles or triples after feeding.
At this stage, it should be strong enough for artisan bread baking.
The Float Test
Although not always necessary, you can perform a float test.
- Fill a bowl with water.
- Drop a spoonful of starter into the water.
- If it floats, it likely contains enough gas for baking.
Remember:
A starter may still bake excellent bread even if it fails the float test.
Growth and doubling are more reliable indicators.
Maintaining Your Starter
Daily Countertop Maintenance
For frequent bakers:
- 50g starter
- 50g water
- 50g flour
Feed every 24 hours.
Weekly Refrigerator Maintenance
For occasional bakers:
- Feed the starter.
- Let it sit at room temperature for 1–2 hours.
- Refrigerate.
Feed once every 7 days.
Reviving a Refrigerated Starter
- Remove from refrigerator.
- Feed normally.
- Allow to rise.
- Feed again after 12–24 hours.
After 1–3 feedings, it should be ready for baking.
Common Problems and Solutions
Starter Isn’t Rising
Possible causes:
- Low room temperature
- Weak flour
- Chlorinated water
- Young starter
Solution:
- Move to a warmer location
- Use whole wheat flour
- Continue feeding
Gray Liquid on Top
This liquid is called hooch.
It indicates hunger.
Either:
- Stir it in
- Pour it off
Then feed immediately.
Strong Vinegar Smell
A very hungry starter may smell sharp or acidic.
Increase feeding frequency until balance returns.
Mold Growth
If you see:
- Pink spots
- Orange discoloration
- Fuzzy growth
Discard the starter immediately.
Pro Baker Tips
Use Whole Wheat Flour Initially
Whole wheat flour contains more nutrients and microorganisms, helping starters develop faster.
Keep Temperatures Stable
Consistent warmth encourages predictable fermentation.
Use a Scale
Weight measurements provide much better results than cups.
Track Growth
Use a rubber band to mark the starter level after feeding.
Be Patient
The most common mistake is giving up too early.
When Is Your Starter Truly Ready?
Your sourdough starter is considered mature when:
✅ Doubles in size within 4–6 hours
✅ Produces a pleasant tangy aroma
✅ Shows strong bubbling throughout
✅ Maintains consistent activity for several days
✅ Successfully leavens bread dough
Once your starter reaches this stage, you’ll have a powerful natural leaven capable of producing bakery-quality sourdough bread for years to come.
