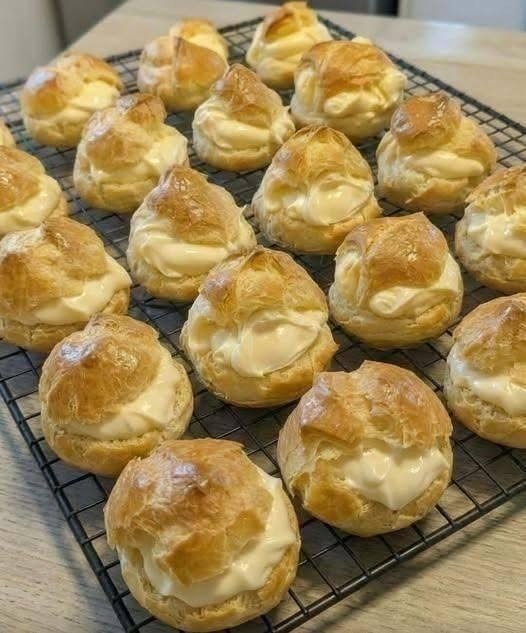

There is something incredibly special about freshly baked cream puffs. Golden, light, slightly crisp on the outside and wonderfully soft inside, these little pastries become even more delicious when filled with smooth, creamy vanilla filling.
Cream puffs may look like a bakery-style dessert, but they are surprisingly easy to make at home. They are made from a simple French pastry dough called choux pastry, which puffs up beautifully in the oven without using yeast or baking powder. Once baked, the hollow centers can be filled with whipped cream, pastry cream, or your favorite sweet filling.
This easy cream puff recipe is perfect for afternoon tea, parties, birthdays, family gatherings, or whenever you want a homemade dessert that looks impressive.
Why You’ll Love This Recipe
These homemade cream puffs have everything you want in a delicious dessert. The pastry is golden and crisp on the outside while remaining light and airy inside. The creamy filling adds sweetness and a smooth texture that perfectly complements the pastry.
Another great thing about this recipe is its versatility. You can make the filling vanilla-flavored, chocolate-flavored, coffee-flavored, or even add fresh fruit for a special touch.
The ingredients are also simple and easy to find.
Ingredients for the Cream Puffs
To make approximately 15–18 cream puffs, you will need:
- 1 cup water
- ½ cup unsalted butter
- 1 tablespoon granulated sugar
- ¼ teaspoon salt
- 1 cup all-purpose flour
- 4 large eggs
For the creamy filling:
- 2 cups heavy whipping cream
- ½ cup powdered sugar
- 1 teaspoon vanilla extract
You can also use prepared vanilla pastry cream if you prefer a richer, custard-style filling.
Step 1: Prepare the Choux Pastry
Begin by preheating your oven to 400°F (200°C). Line a baking sheet with parchment paper.
In a medium saucepan, combine the water, butter, sugar, and salt. Place the saucepan over medium heat and bring the mixture to a gentle boil.
Once the butter has completely melted and the liquid is bubbling, remove the saucepan from the heat.
Add all of the flour at once and stir vigorously with a wooden spoon or spatula.
The mixture will quickly turn into a thick dough.
Step 2: Cook the Dough
Return the saucepan to low or medium-low heat.
Keep stirring the dough for about 1–2 minutes. This helps remove some of the excess moisture and creates the right consistency for choux pastry.
The dough should pull away from the sides of the saucepan and form a smooth ball.
Remove the pan from the heat and allow the dough to cool for several minutes. It should be warm but not extremely hot before you add the eggs.
Step 3: Add the Eggs
Add the eggs one at a time.
After adding each egg, mix thoroughly until it is completely incorporated before adding the next one.
At first, the dough may look separated or slippery, but keep mixing. It will gradually become smooth and glossy.
The finished dough should be thick enough to hold its shape but soft enough to pipe.
Step 4: Pipe the Cream Puffs
Transfer the dough into a piping bag fitted with a large round tip.
Pipe small mounds of dough onto the prepared baking sheet, leaving enough space between each one because they will expand during baking.
If you don’t have a piping bag, you can use a spoon to carefully shape small mounds.
For a neat appearance, gently smooth any pointed tops with a damp fingertip.
Step 5: Bake Until Golden
Place the baking tray in the preheated oven.
Bake the cream puffs at 400°F (200°C) for about 20 minutes. Then reduce the oven temperature to 350°F (175°C) and continue baking for another 10–15 minutes.
The pastries should be beautifully golden brown and feel light when picked up.
Try not to open the oven door during the early part of baking. Opening the oven too soon can cause the pastries to collapse.
Once baked, turn off the oven and leave the cream puffs inside for about 5–10 minutes with the oven door slightly open. This helps dry the centers.
Transfer them to a wire rack and allow them to cool completely.
Step 6: Make the Cream Filling
While the pastries cool, prepare the filling.
Pour the cold heavy whipping cream into a large mixing bowl. Add powdered sugar and vanilla extract.
Using an electric mixer, beat the cream until it becomes thick and forms stiff peaks.
Be careful not to overOnce the pastries are completely cool, it is time for the best part—beat the cream, because it can become grainy and eventually turn into butter.
For a richer filling, you can replace whipped cream with homemade vanilla pastry cream.
Step 7: Fill the Cream Puffs
Once the pastries are completely cool, it is time for the best part—filling them!
You can fill the cream puffs in two different ways.
The easiest method is to cut each puff horizontally across the middle and pipe or spoon the cream into the bottom half. Place the top half back on the filling.
Alternatively, make a small hole on the bottom or side of each cream puff and pipe the filling directly inside.
Fill generously, but avoid adding so much cream that it spills out.
Delicious Topping Ideas
These cream puffs are delicious on their own, but you can easily make them extra special.
Dust the finished pastries with powdered sugar for a simple bakery-style appearance.
For chocolate lovers, drizzle melted chocolate over the tops. You can also dip the tops in chocolate ganache and allow it to set.
Fresh berries, sliced strawberries, raspberries, or a little caramel sauce can also make a beautiful topping.
For special occasions, sprinkle the finished cream puffs with chopped nuts or add a light dusting of cocoa powder.
Important Tips for Perfect Cream Puffs
Use room-temperature eggs: They incorporate more easily into the warm dough.
Do not add eggs too quickly: Add them one at a time and mix thoroughly after each addition.
Avoid opening the oven early: The sudden temperature change can cause the pastries to collapse.
Bake until properly golden: Underbaked cream puffs may collapse after cooling.
Cool completely before filling: Warm pastry can melt the cream and make the filling runny.
Use cold whipping cream: Cold cream generally whips more easily and holds its shape better.
How to Store Cream Puffs
Filled cream puffs are best enjoyed fresh. Because the filling contains dairy, store them in an airtight container in the refrigerator.
For the best texture, try to eat them within one to two days.
If you want to prepare them ahead of time, you can bake the empty pastry shells and store them separately. Once completely cooled, keep them in an airtight container and fill them shortly before serving.
Can You Freeze Cream Puffs?
Yes! The unfilled baked shells can be frozen.
Allow the shells to cool completely, then place them in a freezer-safe container or bag. Freeze them for up to a few weeks for best quality.
When ready to use, thaw them and place them in a warm oven for a few minutes to refresh their crisp texture. Allow them to cool before filling.
Final Thoughts
Homemade cream puffs are one of those desserts that look complicated but are actually quite simple once you understand the process. The secret is preparing the choux pastry correctly, adding the eggs gradually, and baking the pastries until they are completely golden and dry.
Once cooled, fill them with fluffy vanilla cream and finish them with powdered sugar or chocolate for an irresistible homemade treat.
Whether you’re preparing dessert for your family or making something special for guests, these easy homemade cream puffs are sure to disappear quickly. They are light, creamy, golden, and absolutely delicious—and once you master this recipe, you’ll want to make them again and again!